What is IRC

Before even taking action and understanding how to use mIRC, it is good to make a specific overview of the objectives of this program and how it operates. To begin with, mIRC was born as a chat client, specific for Windows operating systems: the software can be used free of charge and without restrictions for a period of 30 days, after which registration is required with the purchase of a personal license (at the price of dollars 20) to avoid waiting a few seconds while the program starts, before being able to use it. mIRC bases its operation on the so-called IRC protocol.
IRC, which stands for Internet Relay Chat, is a messaging protocol developed in the now very distant 1988, a precursor of today's chat systems: it allows you to connect multiple users, identified by a nickname, through one or more servers. On the latter, you can create and manage discussion channels open or private (and password protected) in which to gather multiple users and allow them to communicate publicly and simultaneously.
Furthermore, users can chat with each other even in a "private" way, starting one-to-one communications defined, in technical jargon, Query: in this way, once connected to the server, they are able to communicate privately and outside a discussion room. Also, IRC provides for connection point-to-point, that is the possibility of connecting two users directly without "passing" through the server: this private chat mode is defined, in jargon, DCC chat. With a rather similar criterion, it is possible to initiate point-to-point communications dedicated to the direct exchange of files: thanks to this characteristic of the IRC protocol, entire servers (with related discussion channels) have been created dedicated to sharing files of all types, such as movies, software, music etc.
IRC, in the strict sense of the term, is "only" the protocol (ie the set of rules) with which communications over the Internet are created and managed; a IRC challengeinstead, it is a specific network made up of several IRC server, which users connect to to use chat rooms and connect with each other. To date, there are still many IRC networks that "survived" the evolution of times, each of which has different characteristics, themes and types of users: among the most famous networks of today, they deserve mention GameNet, EFNet, Azzurra e OceanIRC.
In this regard, it is good to clarify a fundamental aspect: users connected to different servers of the same IRC network can see each other, which is impossible for users connected to two different IRC networks. Furthermore, on each IRC network, a nickname is always unique: this means, in simple terms, that two users connected to the same network cannot have two identical identifiers.
How to install mIRC
Now that you have a clear understanding of the characteristics of the IRC network, it is time to move on to practice and understand how the program in question works. As I mentioned in the previous section, mIRC can be installed and used freely on Windows, even without purchasing a license: in the latter case, after starting the software, you will have to wait a relatively short period of time before you can use it.
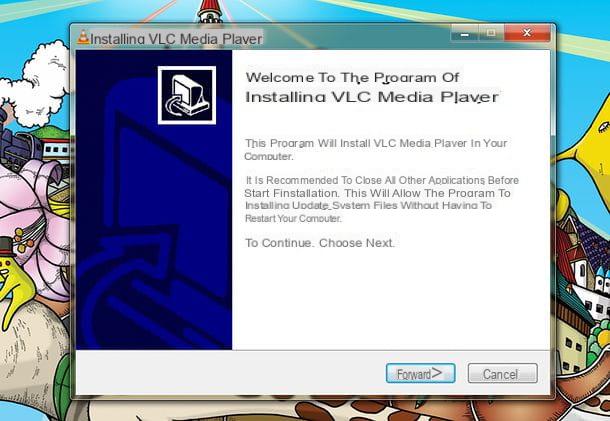
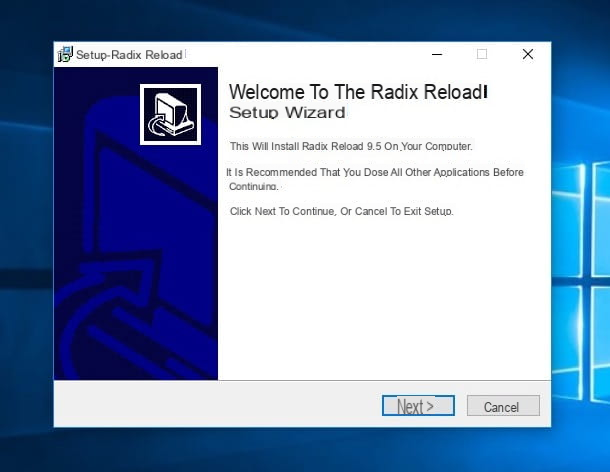
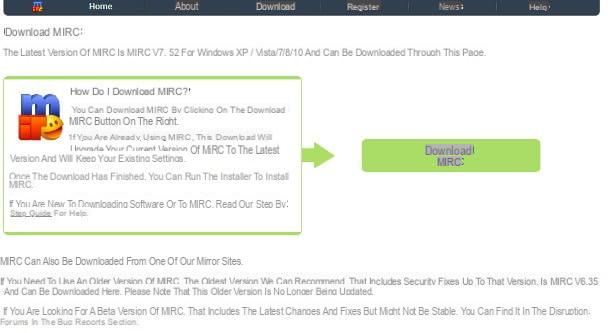
That said, let's take action immediately and see how to install mIRC su Windows. First, connected to the main page of the program, click on the button Download mIRC and repeat the operation on the page that opens, to start the download of the installation program (eg. mirc752.exe). Once the procedure is complete, launch the previously downloaded file, click on the button Yes, then press the button four times Next and finalize the process by pressing the buttons install e Finish.
I remind you, once again, that mIRC is a program available only for the Windows operating system: nevertheless, there are several alternative software that still allow you to access the IRC network from different desktop platforms, such as MacOS o Linux, and they work quite similar to the "original" program: you can find more information in the concluding section of this article.
How to use mIRC to chat and download
Once the mIRC setup procedure is finished, you can recall the program directly from the menu Home di Windows, accessible by clicking on the flag-shaped icon located in the lower left corner of the screen: once the software is started, press the button Continue to accept the terms of use and, if you have opted for use without purchasing a license, press the button once again Continue.
After the first 30 days of "trial" of the program, as I mentioned earlier, you can continue to use it for free, as long as you wait a certain amount of seconds after starting (seconds during which the Continue button is "obscured ").
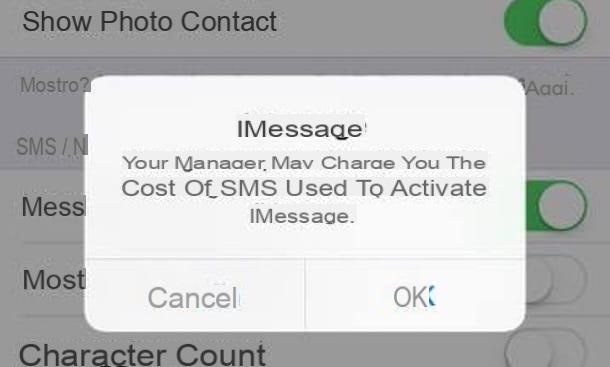
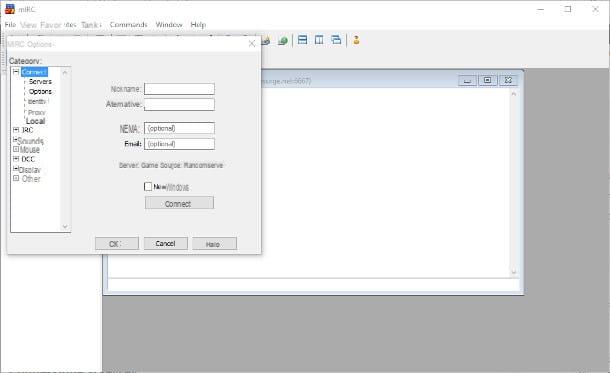
However, once the software is started, it displays the main configuration screen: to begin, type the nickname you intend to use in the appropriate box, also inserting a alternate nickname to be exploited if the nick chosen by you is already in use by another user. Once this phase is complete, press on the section Servers, located on the left, to set the IRC server to connect to.
Remember that, at any time, you can access the mIRC configuration window by pressing the button in the shape of martello located in the top bar (the second button from the left, so to speak).
Connect to the server
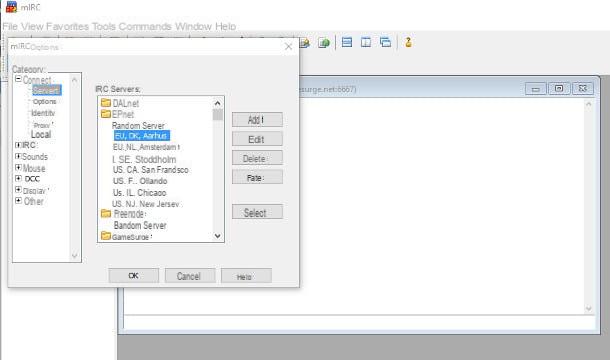
The section Servers, as the name suggests, allows you to configure the IRC server to connect to within mIRC: each folder (eg. Azzurra, EFNet, FreeNode, GameSurge) represents a different IRC network, which you can access by choosing one of the servers available within the folders themselves. Keep in mind that, in some cases, you may need to choose a specific server for the zone (or IP address) from which you are connected: therefore, if you connect to mIRC from the Europe zone, you may have to choose a server of the type Random EU Server.
If the IRC network you want to connect to does not appear in the list, you can always add a new one by clicking on the button Add and filling in the proposed panel as follows.
- Description - enter a description of the server you are adding (eg GiocoNet server EU).
- Address - type the address of the server on which to connect (eg. irc.gioconet.net).
- Ports - specifies the server listening port (or ports, separated by a comma). Typically, IRC servers listen on ports 6666, 6667 e 6668.
- GROUP - type, if you wish, the IRC network to which the server belongs (eg. GiocoNet).
- Password (1) - set, if necessary, the password to access the server.
- Login Method - if the server requires special access to retrieve the saved nickname, you must specify the method within this drop-down menu. Leave the entry unchanged none if you don't know what it is.
- Password (2) - if necessary, type the password to recover the registered nickname.
Once you have entered all the relevant information, press the button Add to add the new server to the list provided by mIRC. At this point, you just have to select the server you want to connect to from the appropriate screen and press the button Select. To connect to the chosen server, first press the button Connect and then Allow access to add an exception to the Windows firewall and finalize the connection operation.
All messages sent by the server, including ping requests, connections made, errors, files sent or received and so on, will be displayed in the status window, accessible from the left panel of mIRC and marked with the wording ServerName Nickname (With art. GiocoNet Salvoconfigurehow). All channels, private chats and DCCs related to the server in use are shown immediately below, with a “tree” structure.
Access to channels
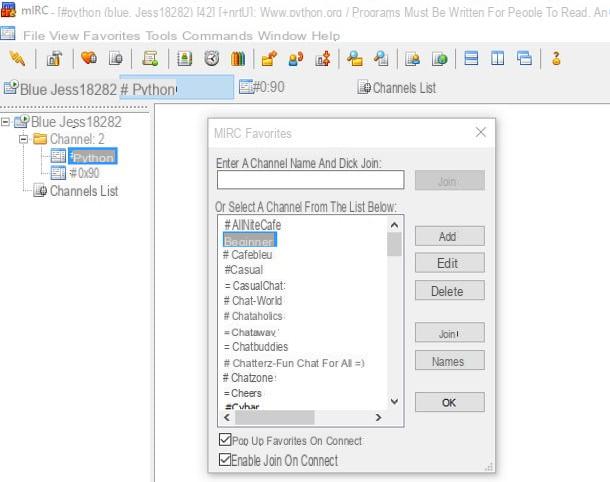
Once the connection phase to the server is completed, mIRC shows a practical window that allows quick access to your favorite channels: first of all, if you want to view it at each connection, put the check mark next to the box Pop up favorites on connect; to activate automatic access to the channels opened in the previous session, then, put the check mark next to the item Enable join on connect.
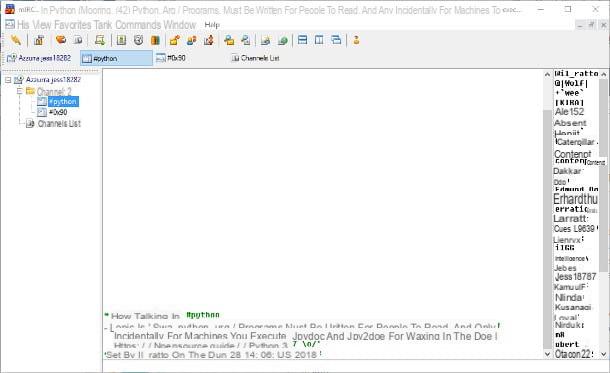
To access a discussion channel, you can type its name in the appropriate box and click on the button Join placed right next to it or select it from the proposed list, and then click on the button Join (located just above the button Names).
If you want to add a channel that you know but that is not specified to the list, press the button Add and fill in the proposed fields with the necessary information, taking care to select the server on which it is present from the drop-down menu Networks; if you want to automatically join the channel when you connect to the server to which it belongs, placing the check mark next to the item Join on connect.
Once you have selected the channels you want to access, you just have to close the selection screen by pressing the button OK: you can view each channel in the foreground by clicking on its name, specified in the left panel inside the folder Channels, or using the appropriate buttons located at the top. To call up the favorite channels screen at any time, click on the icon in the shape of heart placed at the top.
Upon joining a channel, you will immediately see thediscussion topicthe topical, relevant to the same, together with the date, time and operator who set it: pay close attention to this message since, in most cases, it contains the rules of the channel, of the links of interest or, in some scenarios , the instructions for accessing the special commands (this, in particular, happens within the channels dedicated to downloading content).
Once you have entered the discussion channel, all you have to do is click on the text box located at the bottom, write the message you want to send and press the button Submit to start chatting immediately: unless specific settings are made, the message you send will be read by all users on the channel.
Special commands and downloads
If your intent is to download content using mIRC, you must pay close attention to the special commands suggested within the download channels. Before I even give you any instructions on the matter, I want to point out that downloading copyrighted material is illegal and punishable by law and that it is absolutely not my intention to induce you to break the law. Be sure to download only freely downloadable content in the manner described below.
Having made this necessary premise, it's time to take action: in general, the servers and IRC channels responsible for retrieving content are populated by muzzle, that is, by “automatic” users able to start a download after receiving a specific command. These commands are usually specified within the topical of the channel and are different depending on how the manager has set them: just to give you some examples, it may be possible to view a link containing the list of available contents (and the relative commands to receive them) by typing the command !list. If you don't have the faintest idea which server to use for the purpose, I invite you to take a look at my list of In your lenguagen IRC servers and channels to download.
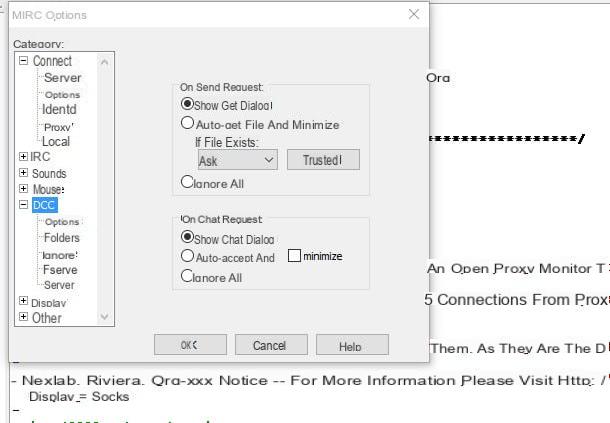
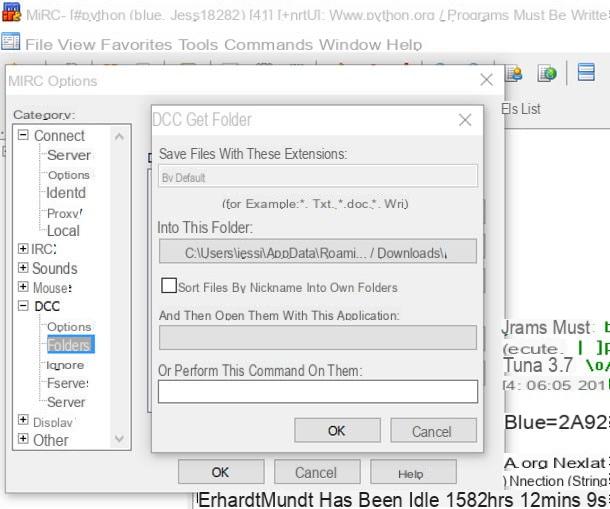
Before you can start a download, you need to "set up" mIRC to receive files via the "direct" connection via DCC, intervening on aspects such as the file download folder and automatic recovery. To set the folder in which to download the files, open the program configuration window by clicking on the button in the shape of martello located at the top, click on + next to the item DCC located on the left and click on the item Folders resident immediately below: at this point, select the item * .wav; *. mp3 placed in the box DCC Get Folders, pigia sul pulsating Delete to delete it, select the entry default e pulsing sul pulsating Edit. At this point, press the button located immediately below the item Into this Folder, choose the folder in which to save the downloaded files and click on the buttons Folder selection e OK to finalize the process.
By default, mIRC is configured to only accept downloads of certain types of files, in order to avoid viruses and threats of various kinds: to remove (or refine) this restriction, click on the item ignore of the program configuration panel and specify within the drop-down menu Method se to accept (Accept only) files with the extensions specified in the box File Type, reject them (ignore only) or deactivate fully protection (Disabled). If you want to add a new extension to the list, you can specify it in the field File type (With art. * .mp3) and press the button Add.
To complete the configuration, click on the item DCC located in the side panel and fill in the box On Send Request depending on your needs: to automatically accept the download of a file, put the check mark next to the item Auto-get file. Furthermore, if you wish, you can have mIRC automatically resume the download of an interrupted file (e.g. due to a sudden program closure or network disconnection) by selecting the item DESCRIPTION within the drop-down menu If file exists. Once all download preferences have been set, press the button OK to make them effective.
From now on, you can use channel-specific commands to download the required files: in many cases, this means sending a request for sending files via DCC to the bot that provides the desired content, by typing a command of the type in the channel window / msg BotName xdcc sendDownloadFileName. However, I advise you to carefully read the download instructions and the rules for correct use indicated in the channel topic, in order to avoid giving wrong commands and / or being permanently removed from the channel itself (in jargon, banned).
The status of each download is specified under the entry Transfer, located inside the left side panel of mIRC (the same in which there is the server status window and the list of active channels, so to speak). If you need some more information about mIRC specific configuration for receiving files, please take a look at my guide on how to set up mIRC.
Private chats
How do you say? Has a chat channel user caught your attention and would you like to have a few words in private with them? Nothing simpler: do it Double-click on the name of the user you are interested in contacting from the list of channel participants (in the right part of the window of the same). Once in the dedicated screen, all you have to do is type your message in the text box located at the bottom and press the key Submit keyboard to send it to the recipient in real time.
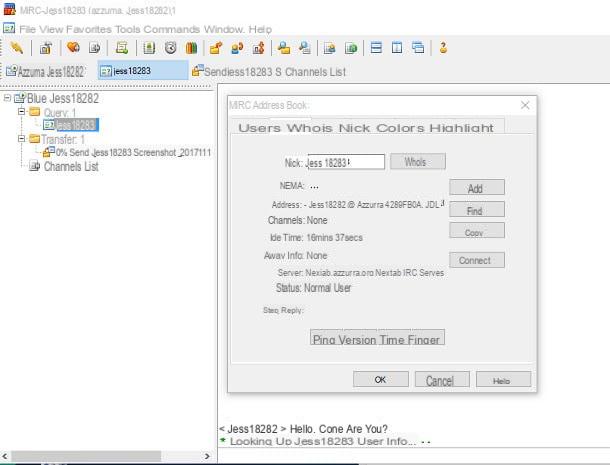
To view more in-depth information about the user you are chatting with (e.g. their full identifier, the non-secret channels to which they belong, the idle time - i.e. the amount of time elapsed since the last message sent on mIRC - and so on away), do click destroy on an empty spot in the private chat window and select the entry Info from the proposed context menu. If you wish, you can achieve the same result by doing it as well click destroy on the name of the user you are interested in, placed in the list of participants in the chosen discussion channel, and then select the item Info from its context menu.
Finally, you can start a private chat with a user whose nickname you remember even without accessing any discussion channel: to do so, once connected to the server, type the command in the text box of the status window / query NickDelContact followed by Submit to open a private conversation window. If the user is not connected at that moment, mIRC will notify you with an error message.
Other useful information
If you have read this far, it means that you have learned perfectly how to use mIRC for both chatting and downloading files. Before I let you go, however, let me give you some more information about this program, which may come in handy in the future.
To begin with, you must know that, although mIRC is a program designed exclusively for Windows, it is not the only one that allows you to access the IRC network: there are in fact numerous software that allow you to connect in a very similar way to servers and to the channels that populate the Internet Relay Chat. Among them, I can mention for example XChat Azure and LimeChat for MacOS, XChat and KVIrc for Linux, AndroIRC for Android and Mutter for iPhone / iPad.
As regards the "protection" of virtual identity, some IRC servers provide for the registration of both nicknames and discussion channels, so as to preserve their ownership and avoid theft: this operation is generally carried out through bots "Owners" NickServ (ns) e ChanServ (cs), by making a rudimentary registration after inserting Password e e-mail. The IRC bots, both the "proprietary" ones and those created by users, are themselves special programs kept running on a server machine, which in turn is properly configured and connected to the IRC network on which they operate.
Furthermore, most IRC channels have different “types” of users: besides users normal, the most used user levels are the Voice (marked with the symbol + next to the nickname of the holder of this status), theoperator (which is instead preceded by the symbol @), Thehalf-op (denoted by the symbol instead %) and IRCOp, the highest level, typically controlled by a server manager (denoted by the prefix !).
In particular, operators have the possibility to intervene directly on other users: they can assign or revoke the status of operator (+ / - @) or the state of voice (+/- v), temporarily remove a user from the channel (kick) or remove it permanently (ban / kickban). Voices, in some cases, can perform the same commands by giving special commands to a muzzle with operator status.
Some IRC channels may be secret (+s) and therefore not visible in the status information of the participants, restricted only to a certain number of participants (+l), password protected (+k) or moderate (+m): on the latter channels, in particular, it is allowed to send messages only and exclusively to users Voice.
How to use mIRC