Join JPG your Windows
Stai using a PC with your installato Windows and you are interested in understanding which tool you need to use to be able to merge two image files in JPG format and above all what operations you need to perform to be able to do this I have good, indeed excellent news to give you: you do not have to download and install anything! Everything you need is already on your computer, standard. It is enough for you to resort to the use of Paint, the image editor pre-installed on all versions of Windows, and that's it. But first you must take the measurements of the images to be joined and if necessary make the necessary changes. Now I'll explain everything, don't worry!
First, right click on one of the images in JPG format and select the item Property from the menu that is shown to you. In the window that opens, click on the tab Details and make a note of the photo size specified in the image properties list. Then repeat the same steps for all the other images on which you intend to go to act.
If you notice big differences between the various images, resize them so that they are all the same size (especially as regards the height). To resize an image open Paint (you can find it in the Start menu or in the Start Screen... depends on the version of Windows you are using), select the item apri from the menu Fillet in the program window and open the first image to edit. Then click on the button Resize and skew in the section Image on the top menu bar (if you are using Windows 10 or Windows 8 / 8.x) or click on the menu Image and then on the voice Attributes (if you are using older versions of Windows).
In the window that opens, select the option pixel, type, in the fields Horizontally e Vertically, the new dimensions in width or height that you want the image to assume and click on OK to save all changes made. Repeat the above procedure together for all the images to be resized.
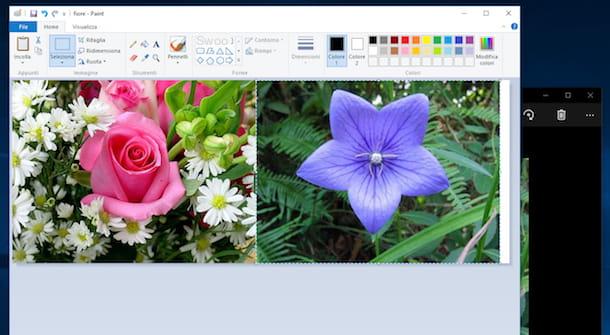
Once all the JPG files have been resized, open a new window of Paint, click on the menu Fillet and select the item apri to open the first image you want to insert on the left in your "composition". Then click on white square which is at the right edge of the image and, continuing to hold, move it with the cursor to the right. By doing this you will create the space needed to insert more photos in the program window.
Now, open another image to be placed next to the one previously opened with any photo viewer (the default Windows one is fine too) and copy it by selecting the item Copy annessa to the menu Modification. Then go back to the Paint window, press the button Paste located in the menu bar at the top (if you are using Windows 10 or Windows 8 / 8.x) or click on the menu Modification and then Paste (if you are using an older version of Windows) to paste the other JPG file next to the one you opened earlier. Repeat this procedure for all images to be merged.
At this point, to merge the various images added in the Paint window, all you have to do is select them with the mouse (one at a time!) And move them next to the photo you had already opened. Clearly, if you prefer, you can perform the same procedure by acting in height rather than in width, does not change anything unless the position of the images.
When you are satisfied with the result, save your composition by clicking on the menu Fillet and then choosing the voice Save with name.
Merge JPGs on Mac
Stai is invented using a Mac, you can go to join two or more JPG files together using Paintbrush. This is a no-cost application for macOS / OS X that is very reminiscent, both in terms of interface and functionality, of the Windows Home Paint program I mentioned in the previous lines. It is very simple to use and it is also sufficiently intuitive. However, this is not an application already present on Apple computers but must be downloaded from the Internet.
To download Paintbrush on your Mac the first move you need to make is to connect to the program's website. Then click on the entry Downloads placed on the side and then on the link Paintbrush 2.1.2. When the download is complete, drag the Paintbrsh icon into the folder Applications on your Mac, right-click on it and select the item apri give the menu that comes mostrato.
Once the software window appears on your desktop, fill in the fields Width e Heigth indicating the size of the image that will contain the JPG files to be merged and then click on the button OK. If you prefer, you can also use the available presets by clicking on the menu Preset and selecting the solution that you think would best suit you.
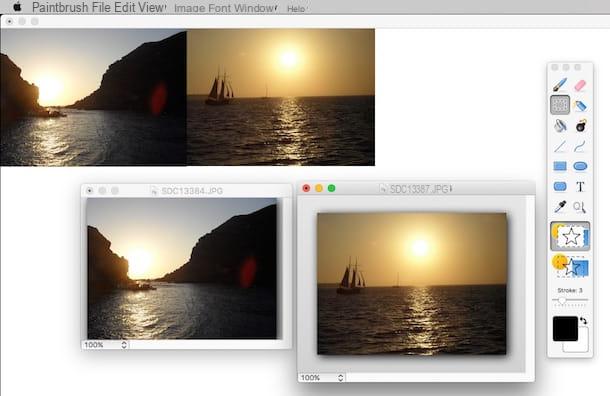
Then click on the menu Fillet at the top left and choose the item Open ..., select the photos you want to merge and then press on OK to open them in the program. Then click on the tool Selection in the Paintbrush toolbar and trace the outline of the image you want to be on the left when you go to join the images together. Then left click on the photo and choose Copy give the menu that comes mostrato.
At this point, right click anywhere in the image to use as a "container" and choose the item paste from the menu that opens to paste the previously copied image. Finally, carry out the same procedure just seen for the other image and once pasted drag it to the right so as to place it next to the first. Clearly, if you want to merge multiple JPG files together you have to create a larger selection area but otherwise the operations to be performed are practically always the same.
To conclude, clicca sulla voce Fillet at the top right of the menu bar, select the option Save As…. type the title you want to assign to your "creation", specify the location on your Mac where you want to save everything and make sure that the JPG format is selected from the appropriate menu (if not, select it yourself) then press on OK.
At the end of the operation, you can use Preview, the image and document viewer pre-installed on all Macs, to refine the image. How you do it? Nothing could be simpler: open the newly created unified image, click on the button Selection tool at the top of the window (if you can't see it, click Show editing toolbar) and outline the merged images to remove any excess edges. Then press on the button Cut out and the game is done.
Merge JPGs online
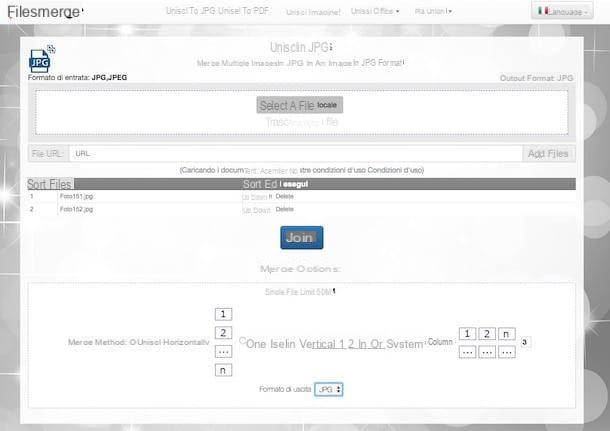
As well as as I indicated in the previous lines, you can also join JPG directly from the web browser, without using any program on your computer and above all without having to install anything. How? Well, simple: using Filesmerge.com. It is an online service designed for the purpose in question. It is free, very simple to use and compatible with all the most popular programs for surfing online. The only thing to take into account is the fact that for each single file there is a maximum weight limit of 50 MB.
To use it, first of all connect to its home page and then drag all the files in JPG format that you want to join together in correspondence with the wording Drop files here. If you prefer, you can also "manually" select the images to merge by clicking the button Select a local file and then choosing the files on your computer. If, on the other hand, the images you want to combine are online, type in the field File URL, the link of the reference image and then click on the button Add files present on the right.
Then wait for the file upload to be started and completed, then select the preferred merge method by choosing from Merge horizontally, Merge vertically or Column system, make sure that in correspondence with the wording Output format the item is selected JPG (this way you will get a single final JPF file) and then click the button Merge in the center of the screen.
Wait a few moments for the procedure to start and complete then click on the link Click to Download it. If you have not made any changes to the default browser settings, the file will be saved in the folder Download Of computer.
If, on the other hand, before downloading the file to your computer you prefer to view an online preview and possibly also make changes, click on the link View & Edit it.
Other solutions to merge JPG
Did the above solutions to merge JPG not satisfy you? Your intention was not simply to "support" two images in JPG format but to create simple photo collage? Then don't throw in the towel just yet! Rather, take a look at the additional resources listed below. You will see, you will not regret it.
- Photor - It is a free online photo editor that not only allows you to edit and create images but, of course, also to merge two or more JPG files (and not only) between them, to apply beautiful effects and much more .
- Shape Collage - It is a nice program available for Windows and Mac that allows you to create very beautiful photo collages and composed of various forms, written and other interesting effects. It's free (but possibly also available in a paid version).
- CollageIt - A program available for Windows and Mac that makes simplicity its strong point. It comes with all the basic functions for creating photo collages, allows you to choose between various templates and share the final results in a few clicks. It's free.
- Collagerator - Another program for Windows and macOS / OS X. It allows you to create various types of collages starting from some models. It has a simple and intuitive interface and provides users with different templates for appealing creations. It's free.