Create an Apple ID (preliminary process)
In order to use iCloud it is necessary to create an Apple account at the end of creating an ID. In order to be able to use your new iOS device, you should still have already created an account with an Apple ID. If this is not the case, I can show you how to proceed.
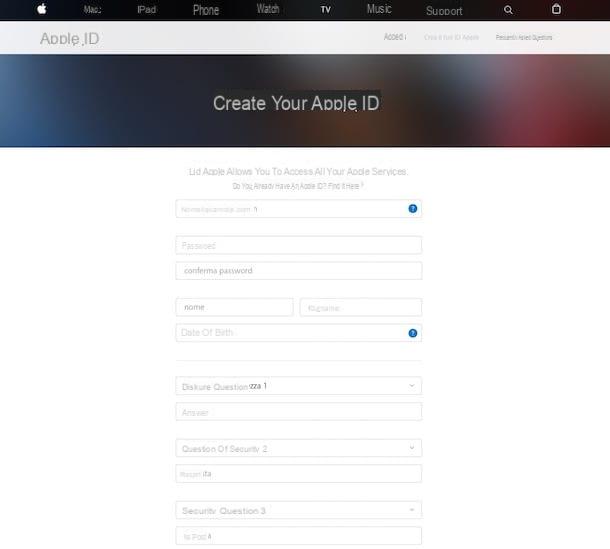
To create an Apple ID, the first thing to do is go to the official Apple website by clicking on this link. You will then have to fill in the registration form that you will see on the screen and, once you have filled in the required text fields, press the button Continue. You will then need to confirm your identity by clicking on the link that will have been emailed to you.
If you want me to show you step by step the procedure for creating an Apple ID, you can read my guide completely dedicated to the subject. Please also note that the procedure for creating an Apple ID can also be easily performed directly through your Apple device, as well as from a web browser.
Finally, I would like to point out that it is possible to register for Apple services, with the aim of creating your Apple ID, also through the iTunes software available for Mac and Windows. On Mac, iTunes is already present as it is pre-installed; on Windows you will have to download by clicking here. To create an Apple ID from iTunes, simply press on the items Account, Login ... and finally on the voice Create a new Apple ID.
Once you have completed creating your Apple ID you can start using iCloud.
How iCloud works on iOS (iPhone and iPad)
In order to use iCloud as the default backup system, you will need to have this item activated during the initial setup of your iOS device. If you forgot to perform this operation, know that it is possible to remedy at any time, acting from the settings of your device. I'll explain, in the following lines, how to proceed.
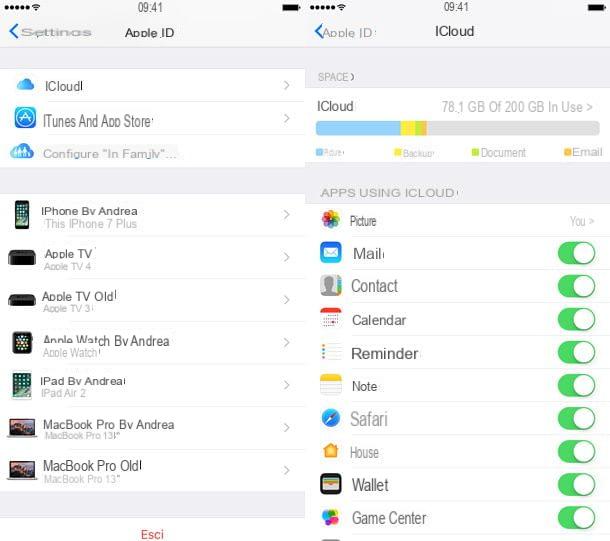
In case you have already activated your iOS device without activating the default iCloud backup, you will need to go to the panel settings (symbol of a gear).
At this point, if you have an Apple device with a recent version of the operating system (iOS 10 or iOS 11), tap on the you don't know to access the section relating to your account and Apple ID.
On the next screen, then tap on the item iCloud. You will then have to move from OFF a ON all levers that refer to the applications. This way the selected applications will have access to iCloud and synchronize all data online.
If, on the other hand, you are using a device that has an iOS version prior to 10.3, you will have to go and locate the entries Settings> iCloud to access the activation panel that I have indicated to you.
You can also use iCloud on your iOS device to learn more about the space occupied by the apps on iCloud, being able to manage this space and possibly increase the storage space.
To access this screen, tap on the app Settings (symbol of a gear). Then tap on your name and then on the item iCloud. Then pressing on the item Manage space you will be able to view detailed information on the space occupied by the apps.
On devices with a version prior to iOS 10.3, this item is visible by tapping on Settings> iCloud> Storage.
On this screen you can view the complete list of apps that have access to the backup service and check the space occupied by tapping on the individual items. To free up space, tap on the items related to the apps with data to be deleted and then tap on the item Delete documents and data.
To increase the storage space you can then press on the item Change storage plan. ICloud pricing is as follows:
- 50 GB of space a 0,99 per month
- 200 GB of space a 2,99 per month
- 2 TB of space a 9,99 per month
Alternatively there is Apple one: an all-in-one solution that offers for 14,95 euros / month 50GB of iCloud Drive space, Apple Music, Apple TV + and the games of Apple Arcade. The Family version of the plan with 200GB of iCloud Drive space. To activate Apple One just go to Settings> [your name]> Subscriptions> Apple One your iOS or iPadOS.
How iCloud works on Mac
As anticipated at the beginning of this guide, iCloud is available on multiple devices, allowing you to synchronize data, documents, backups and photos, then making them accessible on Windows PC and Mac. So let's see together, through a step by step procedure, how to use iCloud on Mac.
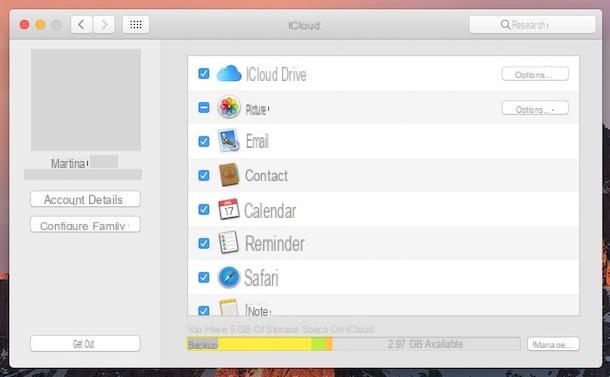
The first thing to do is to activate the service on Mac. To do this, click on the icon magnifying glass located at the top right to activate the feature Spotilight Search. Then type system preferences in the text field that you will see on the screen. Then double-click on the search result (symbol of a gear) and then click on the iCloud entry that you will see in the window that opens.
You will then be able to access the iCloud screen on Mac and check which items you want to be synchronized. To do this, just put the check mark next to the items on the iCloud screen (Contacts, Favorites, Photos, Calendar, eg).
If you want to know more about the synced data and remaining iCloud space, just click on the item Manage ... which you can find located at the bottom right.
To confirm the synchronization of your iCloud data with the respective MacOS applications, simply close the iCloud window.
If, on the other hand, you want to view all the data stored on iCloud Drive, start the Finder (symbol of a smiley) and click on the entry iCloud Drive that you find in the left sidebar. You will be able to view all the documents synchronized in the cloud.
How iCloud works on Windows

You can also use iCloud on Windows, synchronizing your data online to have access even on a PC with the Microsoft operating system.
To do this, and in order to see in detail how iCloud works on Windows, you will need to download and install the desktop client on your computer. Then go to the official iCloud website and press the button Download.
Once you have finished downloading the executable file, double-click on it to install it. Then follow the configuration and installation wizard procedure in order to complete the installation of the software on the PC.
You will also need to log in by entering your Apple ID login information you created earlier. At this point, put the check mark in correspondence with the items you see on the screen (iCloud Drive, Photos, Bookmarks) to synchronize them and have access to data also via your PC.
If you want to have access to some customizations for iCloud, click on the items options in correspondence with the wording Gallery e Bookmarks.
To access your emails, contacts, reminders and calendar, I refer you to the explanation below where I will tell you in detail about how to use iCloud via a browser.
How iCloud works via browser
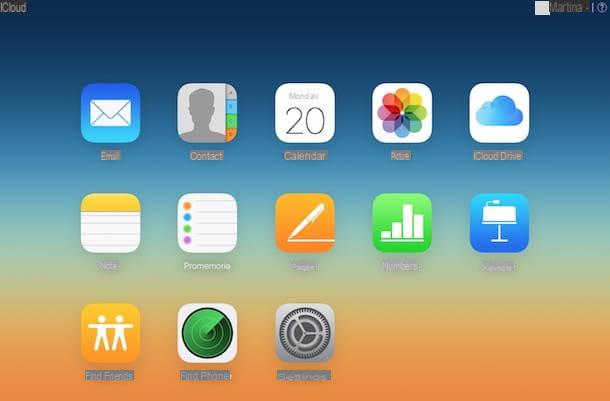
iCloud is also accessible via browser and this allows you to view all synchronized content at any time.
To see iCloud usage and operation, open the browser you use to browse the Internet and visit the official iCloud website (type www.icloud.com in the address bar and press sending from the keyboard).
You will then have to log in to the iCloud service using the data relating to your Apple ID and then press the button with the arrow symbol to access the service. If you are blocked from accessing due to two-factor authentication, enter the code that will be provided to you by your iOS device.
The iCloud home screen is made up of several tools that will allow you to access all synced items online. I'll tell you about it below in detail.
- Mail: through this button you can access your iCloud e-mail account;
- Contacts: this item allows you to access a screen where you can view the complete list of your contacts;
- Calendar: you can have access to your calendar and see all your appointments, through a convenient Web interface;
- Photo: it allows you to view and manage all the photos in the memory of your device via the Web;
- iCloud Drive: allows you to view and manage via the Web all the documents that occupy the memory of your device;
- Note: this button allows you to access and manage all the notes you have written on your iOS device;
- reminder: this is the right section to view and manage your reminders via the Web;
- Pages, Numbers, Keynote: these items allow you to use the Web versions of applications designed for productivity on Apple devices;
- Find Friends: allows you to access the Web version of the service designed to locate other friends with an Apple device;
- Find iPhone: allows you to access the Web version of the service designed to find your lost devices;
- Settings: Access this screen if you need to manage your Apple ID settings or increase iCloud storage.
If you are logged in to iCloud via the web on a PC that is not your own, remember to log out of your account once you have finished using the service. To do this, click on yours username and then on the voice Logout.
How iCloud works