What is Kodi

Although Kodi has literally exploded with the spread of Android TV Boxes, this software finds its roots quite a few years ago, to be precise at the time of the first generation of Xbox, the very famous Microsoft game console: initially Kodi, which at that time was called XBMC (or Xbox Media Center), was a program designed to turn the Xbox into a real one media center, able to manage and organize video content of any kind, music, images and much more.
Over the years, XBMC has been improved and enriched with features and, as I explained earlier, also adapted to many other platforms, including Windows, MacOS, Linux (also in the form of an autonomous operating system, which is called LibreELEC), Android (smartphone, tablet e TV Box), iOS (only previous jailbreak), tvOS and some proprietary operating systems for Smart TVs.
Since it was no longer a program dedicated only to the Xbox, but now capable of transforming any type of device into a media center, in 2014 the development team decided to change the name XBMC to Kodi, without however changing the dynamics of the nor its nature completely ..
In addition to already being a very rich software of its own, Kodi is expandable with many add-on developed by the community, which increase its functionality and possibilities of use: just to give you some examples, it is possible to integrate Kodi with YouTube, access the Web radio available on the Internet or, again, configure it as a program to manage IPTV (streaming programs), all using a series of add-ons available.
How to install Kodi
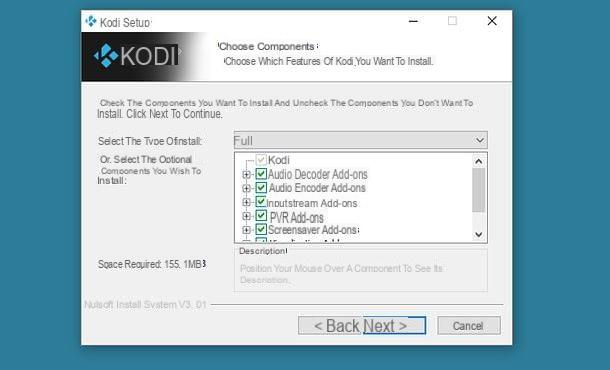
As I mentioned earlier, Kodi is officially available for both computers (Windows, macOS and Linux) and Android, and the installation methods are no different from those you are most likely already familiar with. To install Kodi on your computer, in fact, all you have to do is connect to the program's website, scroll down until you find theicon of the operating system in your possession, and click on it. Then click the blue button Installer (32 bit) at the item Release if you have chosen Windowsclick on your button Installer (64 bit) next to the word Release if you have chosen MacOS, or click on the blue button Install Guide if you have chosen Linux, to receive installation instructions.
Once you have downloaded the file in question, double-click on it and follow the simple on-screen instructions to complete the installation. Regarding Linux, keep in mind that Kodi is already included in most of the repositories of the various distributions, so you can search for it and install it, for example, from the program Software Ubuntu or repositories AUR by ArchLinux. If you have an Android device, you can find Kodi in the Google Play Store and install it as usual, or download the APK that best suits your operating system, while for iOS you will have to install the app via Cydia, after jailbreaking your device.
If what I have told you so far still leaves you a bit uncertain, and you would like more details on how to install Kodi on your device, you absolutely must not throw in the towel: I have a complete guide dedicated to how to install Kodi, which will guide you step-by-step through the various procedures.
Wait, are you telling me that you already have an old version of Kodi, you have never used it, and now that you want to start doing it do you want to upgrade to the latest version? Then you must carefully read my guide on how to update Kodi, in which I show you everything you need to know to proceed with the update safely.
Initial configuration
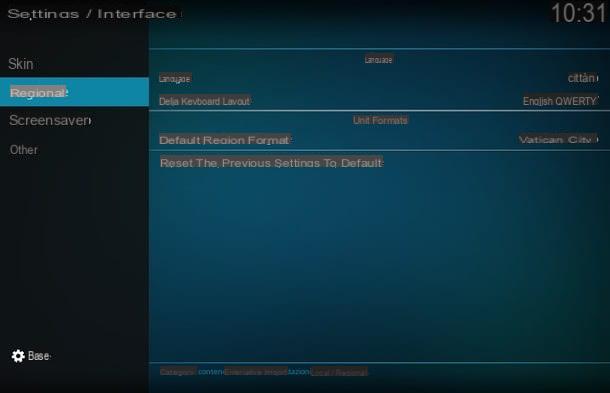
Now that you've finally installed Kodi on your device, it's time to get down to business and start finding out! The first thing you need to do is configure the in your languagen language: click on the small button Settings ⚙ at the top (or select it with the help of the arrows on the remote control and the OK button), select the icon Interface Settings, move to the item Regionalclick sulla voce Language and select city from the list. Click on the item again Regional, then on the voice Keyboard layout and choose from the list the layout that corresponds to your keyboard (if you don't know what to choose, set this item to city in QWERTY), then press OK. If you are using Kodi 16, move around until you reach the entry System, select and click on the item Settings, click on the items Appearance e International, select city from the list and click on the relevant item.
If you don't like the initial appearance of Kodi, you can easily change it by clicking on the entry Skin, then again on the voice Skin that appears on the right, and then on the button Other…: then select a skin from the list that appears, wait for the installation and enjoy your new Kodi! If you don't like the selected skin, you can go back to using the default one by clicking on the item Restore previous settings to default.
Finally, before starting to use Kodi intensively, I recommend that you create a custom user profile, especially useful if you are using a shared device: in this way, each Kodi user will have their own settings and customizations. From the main screen click on the button again Settings, then on the icon Profile Settings (or directly on the items System> Profiles if you are using Kodi 16), then on the voice Profile and icon Add Profile.
Now enter a name for the new profile, click on the button OK, then click on Picture profile if you want to set an avatar, and on Block preferences if you want to protect your profile changes with a Password: to do this, click on the button Yes, on the item Master Lock, then on one of the available options, depending on the password you want to set (numeric password, key sequence or text password), finally, type the Password and click on the button OK, then type one more time and click the button OK.
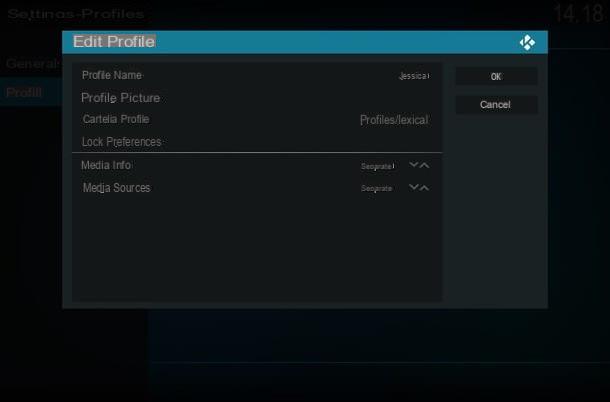
Once you have set up your profile, click on the button again OK and, if you want to start with the settings already present, click on Copy default, otherwise click on the button Start over to create a brand new blank profile and press on Copy default to import existing multimedia sources.
At this point, you just have to start Kodi with the newly created profile: then click on the side item General, move the switch Show login screen on startup su Active if you want Kodi to ask which profile to use at startup (or presses on the item Automatic login at startup to choose the profile to be used automatically when starting the program), if required, enter the Password of the Master Lock and that's it.
Library configuration
Now that you have embellished Kodi and created a personal profile, it's time to start "filling" it with your collections of images, music, videos and so on, so that the program can index them and let you have them at any time. one click away. To set up the library Videos, you must first "tell" Kodi where to get the files by setting one or more source files.
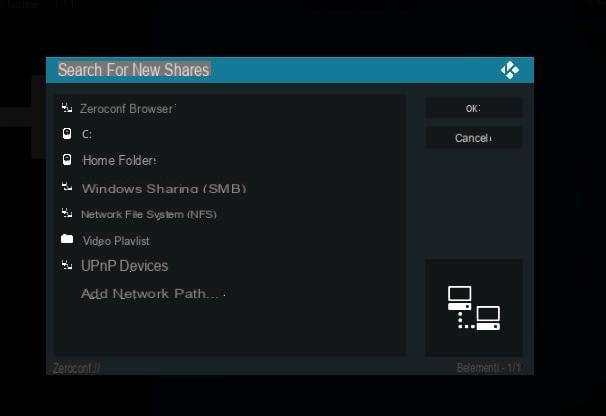
To proceed and add the various sources, click on the item Videos on the main Kodi screen, then on the button Insert file section (for Kodi 16, you can access the same menu by selecting items Video> File from the main screen), then on the item Add Video… And on the button Explore: now click on the most appropriate item for the location of the files you want to import (you can use the Zeroconf manager included to select files on your device, set a SMB sharing to get files from your NAS, a network drive NFS, a playlist, a dispositivo UPnP or custom network path), and follow the simple on-screen instructions to include your files in the library.
When you have returned to the entry screen, click on the path you have just entered, then on the button OK, on the item Enter a name for this Media source and give a name to the chosen source (for example “Movies from NAS”). Press the button twice OK, then on the rumors This Directory Contains e Videos and then click on OK e Yes. You can repeat this procedure for each source you intend to add.
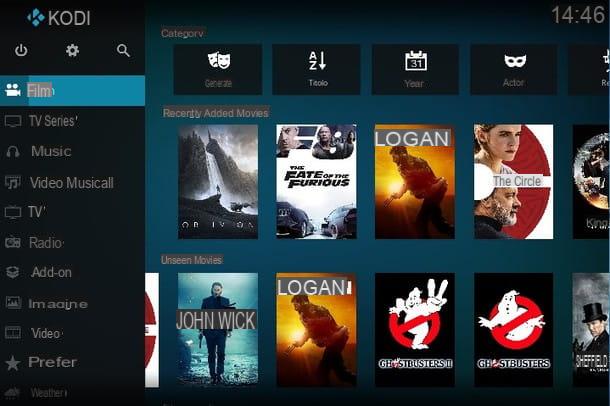
From this moment, you can access the list of imported movies by selecting the side item Videos on the main Kodi screen, while you can view all videos from all sources configured in Kodi by selecting the item Video. Repeat the same procedure to configure the library of TV series, the library of images and that of Music video. To start playing a multimedia file, all you have to do is click on its icon in the dedicated section of the library.
Settings management

I told you at the beginning that Kodi is an extremely powerful program, and I was not joking at all! In addition to being rich in features, this software can in fact be configured and customized down to the smallest detail so as to create a work environment that can be ideal for any type of user. To realize this, you can open the panel Settings, which you can enter by clicking the gear button (I.e. that you find on the main screen of Kodi.
The settings are divided into various sections, which you can access by clicking on the relative icons: you can activate or deactivate the switches by clicking on them and change the settings by clicking on the various items, setting them from the drop-down menus or typing them, where possible. Below I'll briefly explain what you can find in the various settings sections.
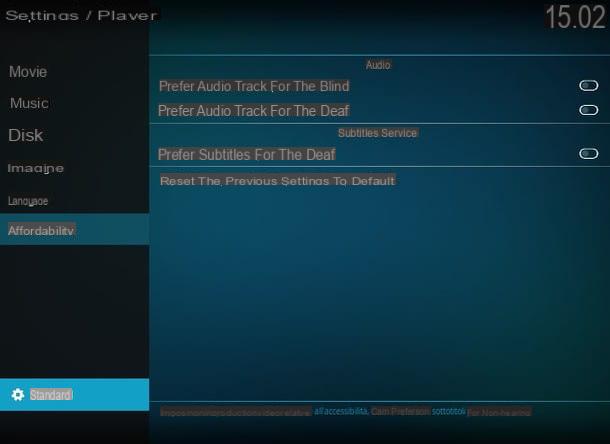
- Player Settings - from here you can set the behavior of the multimedia player included in Kodi. Specifically, you can activate the automatic playback of the videos, the "time jumps" for the skip button, the video refresh rate, the subtitle language, the audio / video synchronization, the fade effect, the settings for the playback of the Blu-Ray and more.
- Media settings - from here you can manage the settings for displaying multimedia content in the various screenshots of Kodi. For example, you can add or remove sources from the library, choose how icons are displayed, select the database from which Kodi retrieves information, enable or disable the creation of previews, set whether or not to automatically update libraries at startup of the program and much more.
- PVR & TV settings - this section allows you to access the settings for managing IPTV and digital recording of contents (PVR). It also allows you to manage channels (add, edit and delete), on-screen controls (OSD), the digital guide and the playback options (change after pressing “OK”, initial playback mode and so on) and for recording the audio and video channels.
- Service settings - from this section it is possible to define the behavior of Kodi in the context of content use services. For example, from here, you can set the name of the device on which Kodi is running, the control program (for example, you can activate the web interface or control via app), the options relating to playback technologies UPnP e DLNA, as well as enabling or disabling ad support AirPlay and weather services.
- Interface settings - from here it is possible to define the appearance of Kodi in all its details. As seen above, you can choose and customize the skin of the program, the language and regional options, the screensaver password Master Lock and the behavior when starting the program.
- Skin settings - from here it is possible to define the behavior of the Kodi interface: for example it is possible to activate or deactivate animations, touch mode, weather information, labels relating to multimedia files, you can add or remove items to the main menu or customize the background images for the skin, the weather and the various sections of the program.
- Profile settings - this is also a section that you have already encountered previously: from here it is possible to completely manage the profiles associated with Kodi, add new ones or delete existing ones, as well as "instruct" Kodi on which profile to use at startup.
- System Settings - this section allows you to define in detail the behavior of Kodi. For example, it is possible to choose whether to start the program in window or full screen, set the output device for the audio, the input device for the commands, the Internet access modes (e.g. via proxy), the settings for energy saving (e.g. turning off the screen), settings for installing and updating add-ons, and logging settings (i.e. event recording).
- System information - this is a summary section on the status of the operating system and the device on which Kodi is running. For example, from here you can view processor status and memory usage level, machine IP address, program run time, disks status, network status, video hardware details , and so on.
- Event log - from here it is possible to access the list of events recorded by the program (for example scans completed or failed), if the recording has been enabled from the screen System Settings> Logging.
- Fillet - from here you can access a file manager included in the program: it is very basic and only allows browsing between files and folders in the memory, but it is still useful if the device does not have an independent manager.
As for Kodi 16, the organization of the settings is slightly different: you can access it by selecting the item System> Settings from the main program screen, with the items organized as follows.
- Appearance - this section allows you to configure the appearance of Kodi: you can change the skin, the language, the display of the file list and set the screen saver and energy saving.
- Video - here are the settings for managing the video library and lists, for playing files, and for subtitles.
- TV - in this section there are the settings related to the use of Kodi in TV mode, including the settings related to the playback and recording of channels, OSD controls, electronic guide and more.
- Music - the Music section contains the settings relating to the display of the music library, the playback of the songs and the playback behavior of the Audio CDs.
- Images - here you can manage the display of the image lists and the mode presentation.
- weather - in this section it is possible to choose the weather service to rely on, for viewing the forecasts on the dedicated program screen.
- Add-on - from here you can install and uninstall add-ons, both from repositories and from external files.
- Services - this section allows you to configure Kodi as a network service, defining the name of the device, the behavior of UPnP e DLNA, control via web interface or third-party app, and enabling compatibility with AirPlay.
- System - this part allows you to define the Kodi display mode (in window or full screen), to calibrate the video, to set an audio output, an external control device, to activate energy saving and event recording.
One of the strengths of the Kodi Settings panel is that it also adapts to the type of user: by default you will see the panel containing the standard settings, that is, the most popular ones, but by clicking on the last item on the side panel (which is initially called Standard and is flanked by a gear icon) you can also activate the display of Advanced settings, expert settings or, again, of basic settings.
Also, each setting section contains the item Restore previous settings to default, which allows you to restore the settings visible in the section you are in to their initial values.
Add-on configuration
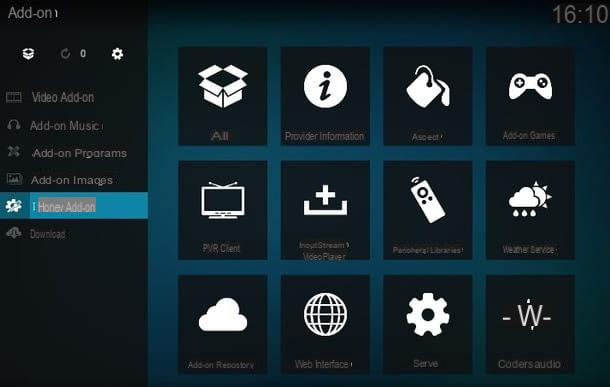
If you have come to read this far, you are surely aware of how much Kodi is customizable and can adapt to all needs, but there is another aspect not to be overlooked to get a 360 degree overview of this fantastic program: the section add-on. As I have already mentioned above, add-ons are extra components that can be added and activated if necessary, this in order not to burden the main program very much without giving up the possibility of customizing it for your own purposes.
In Kodi, add-ons are usually written by the community and added to a detail Repository already included in the program, so you can install them in seconds and without having to download them manually. By default, the add-ons included in the default repository are divided into category: you will find add-ons dedicated to video, All 'audio, All 'appearance, To games, to the subtitles, images, weather and many other categories as well. The fact remains that, if you need an add-on not available in the repository and / or available on an external website, you can easily download it in memory and install it manually, always using the Kodi interface.
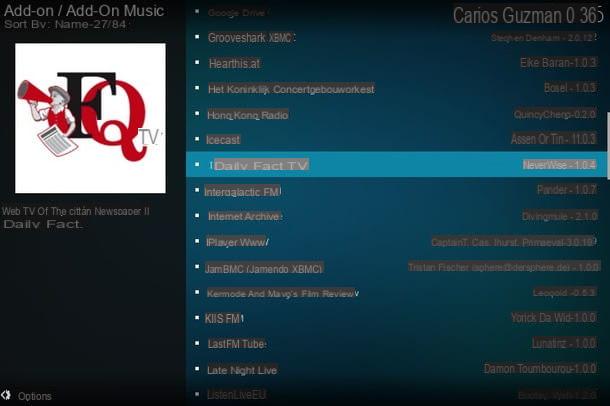
That said, to access the Kodi add-on section, click on the button Add-on found on the main screen of the software, then on the button Download and on the button related to category of add-ons to download: for example, to integrate the programs of RAI Yo-Yo on Kodi, click on the button Add-on Video and then click on the item RAI Yo-Yo which you will find by scrolling down, click on the button Install and wait for the notification to appear Add-on installato.
Kodi 16, you must select the item instead System> Settings, click on the item Install from Repository, select the category of interest, then the add-on, and finally press the button Install. The installation procedure is the same for all add-ons, however some of them require a dedicated configuration: to proceed, immediately after installing an add-on, click on it in the list of available add-ons and press the button Configure.
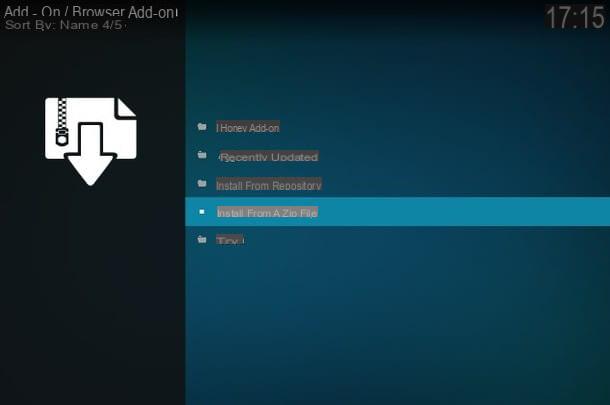
install an add-on from a zip fileInstead, you must first enable installation from unknown sources: then click on the button Settings, by pressing the button System, then on the voice Add-onsposta su Active l'interruttore Unknown sources and click on the button Yes. Go back to the main Kodi screen, click on the button Add-on, then on the box-shaped button at the top and finally on Install from a zip file. Then follow the instructions on the screen to complete the installation of the add-on and the game will be done in a few clicks (or taps).
You can call up an add-on in two different ways: if you remember the category of the add-on, select the category from the main Kodi screen (Music, Videos, Movies, TV Series, etc.), move to the item Add-on and click on the add-on you want to use, otherwise always from the main Kodi screen click on you add-on, then click on the item My add-ons and then on the icon All. By the way, do you know that it is thanks to an add-on that Kodi can "transform" into a television and manage IPTV lists? Find out how to do it in my guide dedicated to how to watch TV on PC!
Have you seen? To understand how Kodi works it wasn't difficult at all, especially if you've read all my tips and advice on how to best use it! How do you say? Is it really a huge program? You're right, but after understanding the basic techniques, you just need a little practice to make it yours, take advantage of it and customize it according to your needs.
Kodi: how it works