Trying to free up some space on your smartphone's memory, did you accidentally delete some photos that you shouldn't have deleted? Have you just realized that you have accidentally deleted some work documents and are desperate because you don't know how to recover them? Don't despair, the last word hasn't been said yet!
If the portion of your memory that was hosting the files that you deleted has not been overwritten yet, i.e. it has not been occupied by other data yet, you still have some hope of recovering them. All you need to do is install data recovery software and scan the hard drive, microSD or portable device on which the files that you deleted by mistake were stored, with a bit of luck, you will be able to recover your data and thus reduce, at least partially, the damage caused by your carelessness.
Also know that if you use a cloud storage service, such as Dropbox or iCloud Drive, you can try to recover deleted files using the backup features included in the latter. But we'll deal with this in the final part of the tutorial, now let's focus on "traditional" data recovery software and see how to make the most of it on Windows, MacOS and Linux. I cross my fingers that you can recover all your files. The best of luck!
PhotoRec/TestDisk (Windows/macOS/Linux)
If you need to recover deleted files from a hard drive, USB stick or SD card, I strongly recommend you to contact PhotoRec. In case you have never heard of it, it is a free and open source software that allows you to recover a lot of file types - images, videos, documents, etc. - in a handful of clicks. It is compatible with all major computer operating systems: Windows, macOS and Linux and does not require tedious installation procedures to be used. It comes paired with TestDisk, another free software that allows you to recover lost partitions and make bootable disks that are no longer bootable: it is very effective, but you shouldn't need it at the moment. That said, let's get to the action!
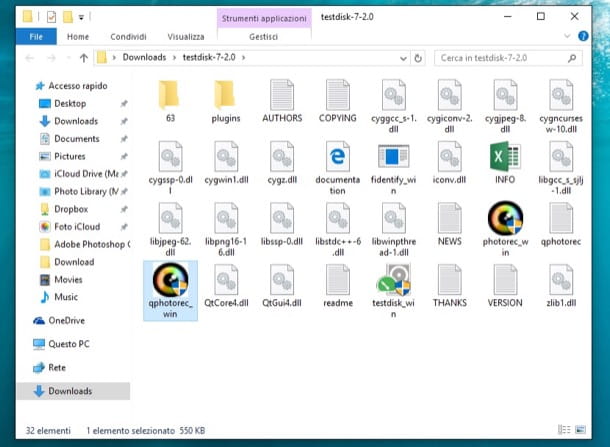
To download PhotoRec (and TestDisk) to your PC, connect to the program's website and click on the item corresponding to the operating system installed on your PC (choose "Windows" regardless if you use a 32 or 64 bit Windows version). When the download is finished, open the zip archive containing PhotoRec and TestDisk, extract the contents into a folder of your choice and launch the qphotorec_win.exe executable.
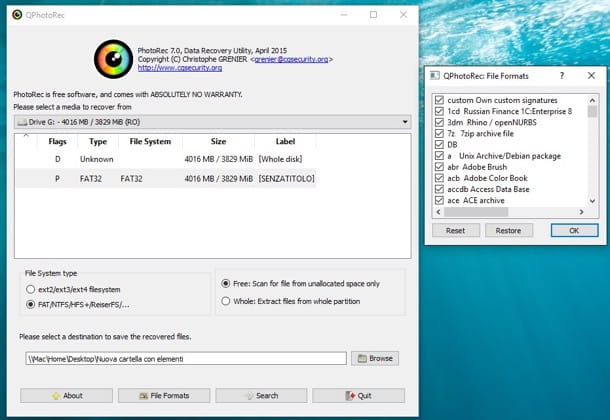
In the window that opens, expand the drop-down menu at the top and choose the drive for the device from which you want to recover data. Then click on the entry corresponding to the main partition of the drive and press the File Formats button, to select the file types you want to recover (the fewer file types you select, the less time the software will take to do its job).
Next, place a checkmark next to the Whole and FAT/NTFS/HFS+/ReiserFS options, click the Browse button and select the folder where PhotoRec should save the files it can recover. To finish, press the Search button and wait for the recovery of the deleted files to be completed and they will be automatically saved in the previously selected folder.
Note: On macOS and Linux, PhotoRec comes without graphical interface. If you want to find out how to use it from the terminal, please follow the instructions on this web page.
EaseUS Data Recovery Wizard (Windows/macOS)
EaseUS Data Recovery Wizard is one of the best data recovery programs. Available for both Windows and MacOS, it allows you to recover any type of files (photos, videos, music tracks, documents, emails, compressed archives etc.) from hard drives, SSD drives, USB devices, memory cards, cameras, smartphones, tablets and other storage devices.
It has an extremely intuitive interface (completely translated into English) and works even in seemingly desperate situations. For example, it allows you to recover data from formatted or damaged disks, deleted partitions and RAW partitions. In addition, it is also able to work after system crashes or malware infections.
There are several versions of this software produced by EaseUS: a free version, EaseUS Data Recovery Wizard Free, which allows you to recover up to 500MB of data (which becomes 2GB if you share the program online) and a paid version, EaseUS Data Recovery Wizard Professional, which is priced from 66.69 euros but has no limitations on the amount of files you can recover. EaseUS Data Recovery Wizard Professional can be downloaded for free, but if you do not activate your copy of the program with the purchase of a license, it does not allow you to export the files (it only displays the data that can be recovered).
To download EaseUS Data Recovery Wizard Professional for Windows, go to the official EaseUS website and click the Free trial button; if you prefer to download EaseUS Data Recovery Wizard Free, go to this other page of the EaseUS website and click the Free download button.
When the download is complete, regardless of which version of the EaseUS Data Recovery Wizard you have downloaded, open the .exe file you have obtained and answer Yes to the warning that appears on the screen. Then make sure that the EaseUS license conditions box (bottom left) is checked and press the Install now button to start downloading and then installing all the components necessary for the program to work.
If you don't want to send anonymous usage statistics, click on Customize installation (bottom right) and uncheck the box below. After the installation is complete, press the Start Now button to close the window and access the main EaseUS Data Recovery Wizard screen.
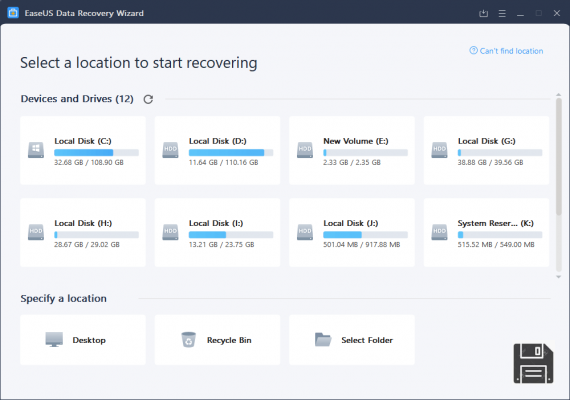
At this point, you need to select the icon of the drive from which you want to recover data (internal or external or whatever) and click on the Scan button, at the bottom right corner, to start searching for the files to be recovered.
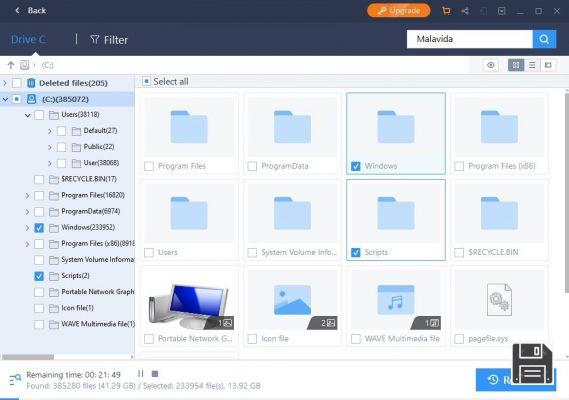
Once the scan is complete, use the side navigation bar to "browse" the paths where EaseUS Data Recovery Wizard found data to recover. Then tick the files you are interested in and press the Recover button at the bottom right to start exporting them to a folder of your choice.
If, before exporting a file, you want to preview it, click on the eye icon located in the upper right corner. If, on the other hand, you want to limit your search to a specific file type (e.g. Graphics, Documents, Video, Audio or Email), click on the Filter item (top) and select one of the available options in the menu.
I beg your pardon? Are you using a Mac and would like to know how to download EaseUS Data Recovery Wizard on your Mac? No problem - just visit the links I provided earlier and click on the Mac version of the program.
When the download is complete, then open the obtained .dmg package and drag the EaseUS Data Recovery Wizard icon into the Applications folder of your Mac to install the software. That's it!
Recuva (Windows)
Another data recovery software that I strongly urge you to try is Recuva, which allows you to recover photos, videos, compressed archives, Office documents and other types of files from various storage media and devices: hard drives, USB flash drives, SD cards, portable media players etc. It is completely free of charge and is available in two versions: a standard and a portable version that can be copied to USB sticks and portable hard drives and does not need any installation to be used. I recommend the portable one.
To download the portable version of Recuva to your PC, connect to the program's website and click on the Download button located under the heading Recuva - Portable. When the operation is complete, open the zip archive containing Recuva (rcsetupxx.zip), extract the contents into any folder and launch the recuva64.exe executable if you are using a 64-bit operating system or the recuva.exe executable if you are using a 32-bit operating system.
In the window that opens, if the interface of the software is not translated into English, click on the "x" at the top right, then press the Options button, select the English item from the drop down menu for language selection and click OK, to save the changes.
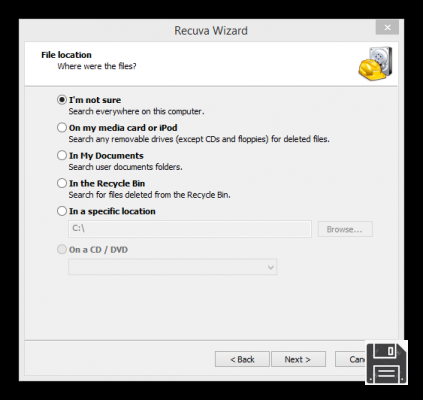
At this point, close Recuva and restart it. Then click the Next button, choose the type of files to recover (images, music, videos, documents or all files) and click Next again. Now select the drive where you want to search for data (leave a checkmark on I'm not sure, to search all drives) and click Next and Start, to start scanning.
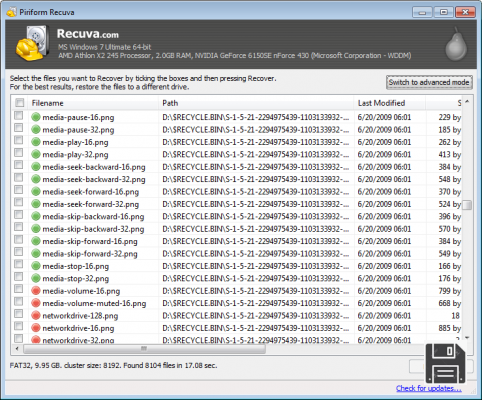
At the end of the check (it may take several minutes), put a check mark next to the name of the files you want to restore and click the Restore button, to select the folder where you want to save them. The data is marked with colored traffic lights: those in green are 100% recoverable, those in orange can be restored but are probably damaged and files marked in red are almost completely unreadable.
Note: If Recuva cannot find the files you are interested in, try restarting the program and put a check mark next to Enable Deep Scan on the last screen of the initial setup. This way the software will scan the drive more thoroughly (taking longer but increasing the chance of finding files that did not appear in the standard scan).
Disk Drill (Mac/Windows)
Now I want to tell you about Disk Drill, a deleted file recovery software born on macOS and later also arrived on Windows. It is very reliable but I personally recommend it only to Mac users, Windows users would do well to evaluate the other solutions proposed in this tutorial first.
Disk Drill supports all types of files and is able to act on various media: hard drives, USB sticks, cameras, iPhone, iPad, Android terminals, SD cards etc. Unfortunately it is not free, it costs 79 euros, but it is available in a trial version without time limits that allows you to find out what files you can recover and allows you to preview them.
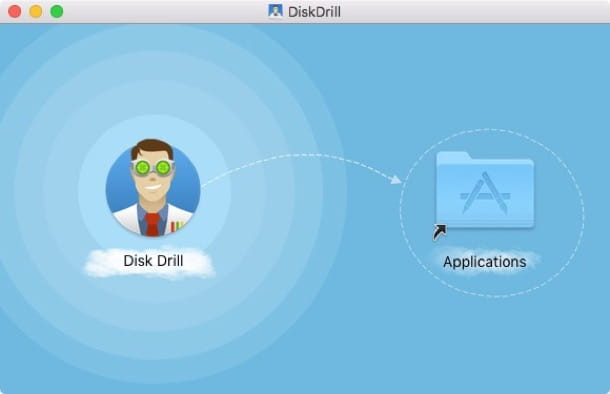
To download the Disk Drill for Mac trial, go to the program's website and click the Free Download button. At the end of the download, open the dmg package that contains Disk Drill, copy its icon in the Applications folder and start the software.
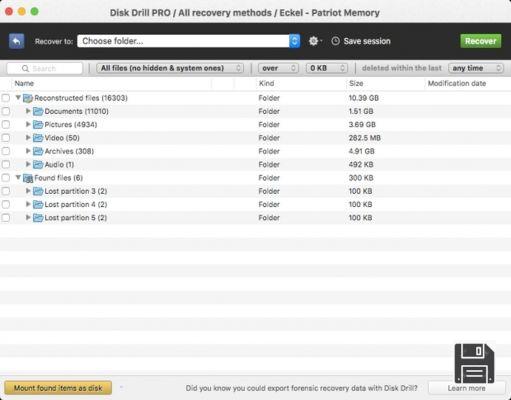
In the window that opens, click the Start button and type your MacOS administration password to start using Disk Drill. Then click on the Recover button located next to the drive name on which to search for deleted files and wait a few seconds for the scan to complete.
At the end of the operation, expand the folders with the files found by Disk Drill and, if you want, preview them by clicking on the eye icon next to their names. The Recover button, through which you can save the files found by Disk Drill, works only in the paid version of the program.
Note: Disk Drill includes a function for monitoring hard disk health that remains active in the macOS menu bar (top right corner). To disable it, click on the disk temperature indicator and select Configure S.M.A.R.T. monitoring from the menu that appears. Then uncheck the Monitor Disks item to detect hardware problems (via S.M.A.R.T.) and you're done.
EaseUS MobiSaver (Windows/macOS)
Do you need to recover deleted files from a smartphone? In this case I recommend using EaseUS MobiSaver, a data recovery software that allows you to recover photos, videos, contacts, messages and other data from smartphones of all major brands. It is available in two versions: one for iPhone which is compatible with Windows and macOS, and one for Android which is only compatible with Windows. It's not completely free: the iPhone version costs €55.79 and the Android version €36.95, but you can download and use it for free with no time limit. The only limit present in the free version is the number of files you can restore at the same time, i.e. one (this means that to restore 10 photos, for example, you have to select the images individually and click 10 times on the export button).
In my example I'll use the EaseUS MobiSaver version for iPhone, but the directions I'm going to give you are more or less the same also for the Android version (which needs root). Ready to get started? Well, then connect immediately to the website of the program and click first on the Free Download button and then on Download Now, to download it to your PC.
When the download is complete, open the EaseUS MobiSaver installation package (ems_free.exe) and click first on the Yes button and then on OK and Next. Then put a checkmark next to I accept the terms of the license agreement and click Next, Next, Install and Finish in sequence to complete the setup. Uncheck the option Join EaseUS Experience Client program if you do not want to send anonymous usage statistics to easeUS.
On Mac, to install EaseUS MobiSaver simply open the dmg package containing it and drag the application icon into the Applications folder of macOS. That's it.
Once the installation is complete, start EaseUS MobiSaver, click on the Scan button next to the name of your smartphone and wait for the device to be scanned. You may be asked to enter your iTunes backup password. Alternatively, you can click Recover from iTunes Backup or Recover from iCloud backup to recover files from iTunes or iCloud backups.
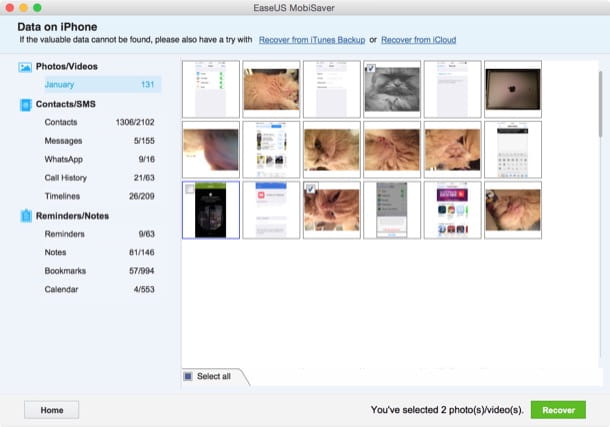
Once the search results appear, select the files that you want to restore and click on Recover button to recover them. Easy, right?
DiskDigger (Android)
If you use an Android smartphone or tablet and you have unlocked it through the root procedure, you can use an application to recover deleted files directly from your device, without using your PC. There are several that you can turn to, but I personally recommend DiskDigger which is very easy to use and in my tests it has proved to be very effective.
DiskDigger is able to work both on device memory and microSD and supports various types of files. It is available in two versions: a free one that allows you to recover only files in JPG, PNG and MP4 format (so only photos and videos) and a paid one that costs 3.37 euros and also allows you to recover music, applications, documents, compressed archives, etc..
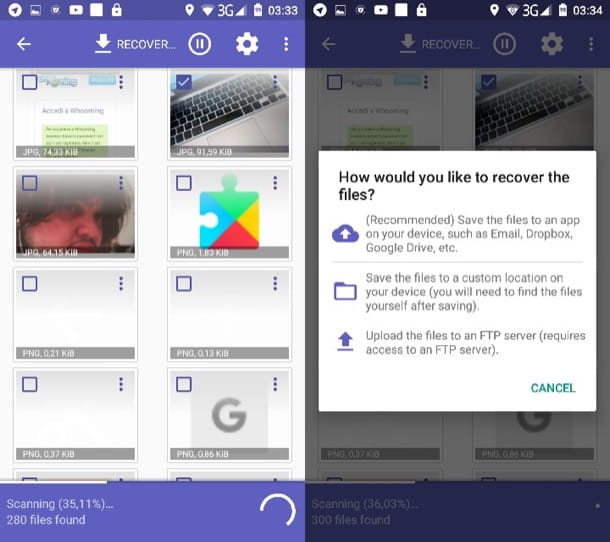
The operation of DiskDigger, as mentioned above, is very intuitive. After downloading the application to your smartphone or tablet, press the Grant button to grant you root permissions and refuse to switch to the Pro version (if you are using the free one) by "tap" on the No, thanks button. Then select the portion of memory to be scanned (it should be bold), put a check mark next to the types of files you want to recover and press OK, to start the scan.
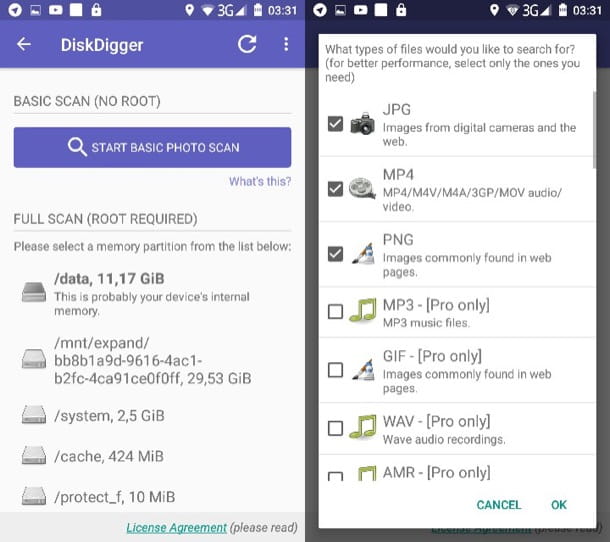
At this point, wait until you are shown the list of files that can be restored, select the ones you want to recover and click on the Recover button located in the upper right corner. To finish, choose whether you want to export the files to a cloud storage service, whether you want to send them to yourself via email or store them on your smartphone/tablet memory.
Cloud storage services
As mentioned at the beginning of the post, if you deleted a file from Dropbox, iCloud Drive, Google Drive or OneDrive, you can recover it using the recovery features included in these popular cloud storage services (which store deleted files for a few days before deleting them permanently). Here's how to do it.
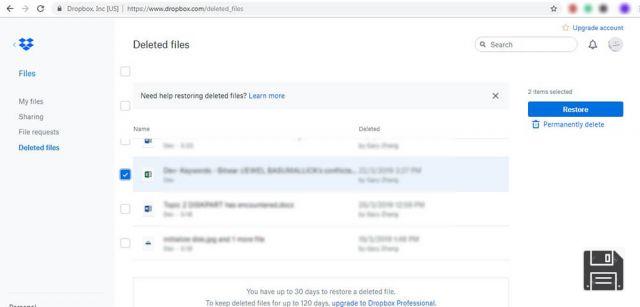
- Dropbox - connect to your Dropbox account from your browser, select the recycle bin icon from the left side bar, locate a file to restore and click the Restore button next to its icon. The item will be restored to your Dropbox folder.
- iCloud Drive - connect to iCloud.com and sign in with your Apple ID. Then click on your name at the top right and select iCloud Settings from the menu that appears. On the page that opens, click the Restore Files item (at the bottom left), place a checkmark next to the files you want to recover, and click the Restore button to restore them to their original location on iCloud Drive.
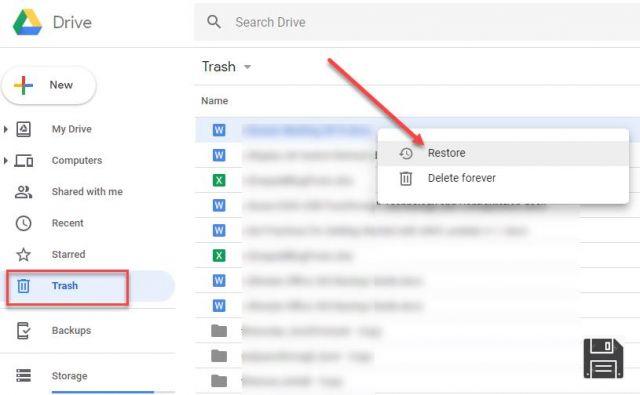
- Google Drive - connect to your Google Drive account from your browser and select the recycle bin icon from the left sidebar. Then select the files to recover and click on the clock icon in the top right corner to restore them.
- OneDrive - connect to your OneDrive account from your browser and select the recycle bin icon from the left side bar. Then place a checkmark next to the files you want to restore and click the Restore button (top left) to return them to their original location on OneDrive.
Other cloud storage services also include a restore feature to recover deleted files. The procedure to follow is almost always the same (select the recycle bin icon and select the items to recover).
Article made in collaboration with EaseUS.